
Docker containers are amazing AND they’re surprisingly simple to make! As long as you know the basics of Linux you have what it takes!
All you need is:
- A program that runs in Linux to containerize
- A base image
- A startup script to launch the program (you could call it directly, but this gives us some flexibility)
- a dockerfile to put it together
I’m a big fan of the new HITMAN video games, but annoyingly you need to always be online to use most of the features. Thankfully some really smart folks made a little Node.JS HITMAN server replacement you can point your game at instead if you’d rather play locally called “The Peacock Project“. This program is great, and I noticed no one else had made a containerized version yet so I went ahead and did that myself!
Come along with me as I update it to the latest version and you can see how simple the process is.
First, let’s take a look at the Dockerfile on my github page:
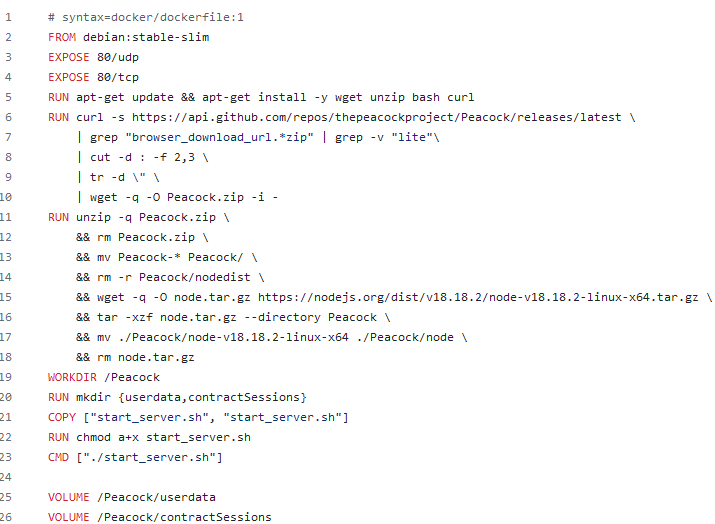
Some of this is a bit convoluted, but I’ll break it down (I promise it’s not that bad!) Running this file “compiles” your docker image so the file needs to include information on all the steps it takes to put your container together.
# syntax=docker/dockerfile:1The first line simply indicated that this is a dockerfile
FROM debian:stable-slimThis line indicates what base image to use. Debian slim is just what it sounds like: a version of Debian that doesn’t have much bundled in with it, this will help keep our image super small.
EXPOSE 80/udp
EXPOSE 80/tcp
These two lines indicate which ports internal to the container should be exposed externally. These will be whatever ports your application itself uses (assuming it needs to talk over the network). In this case, Peacock uses port 80, the standard unencrypted web traffic port. When you go to setup an instance of the image you can map these to different external ports on your host.
RUN apt-get update && apt-get install -y wget unzip bash curlThe “RUN” command specifies that you want to run some shell commands internally to the image. In this case, make sure that our package lists are up to date and install the wget, unzip, bash, & curl tools, as we’ll need those later (yes, this base image is THAT slim!)
RUN curl -s https://api.github.com/repos/thepeacockproject/Peacock/releases/latest \
    | grep "browser_download_url.*zip" | grep -v "lite"\
    | cut -d : -f 2,3 \
    | tr -d \" \
    | wget -q -O Peacock.zip -i -
This is the most complicated bit, but essentially I’m telling it to go to the releases page of the peacock github repo and download the .zip file for the release tagged “latest” and renames it to “Peacock.zip” to keep things simple.
This is pretty cool and makes updating my docker image semi automatic – when there is a new version I just have to compile the dockerfile again and it will automatically grab the newest version for me. A lazier version of this could have a hardcoded download link and would need to be updated between versions.
RUN unzip -q Peacock.zip \
    && rm Peacock.zip \
    && mv Peacock-* Peacock/ \
    && rm -r Peacock/nodedist \
    && wget -q -O node.tar.gz https://nodejs.org/dist/v18.18.2/node-v18.18.2-linux-x64.tar.gz \
    && tar -xzf node.tar.gz --directory Peacock \
    && mv ./Peacock/node-v18.18.2-linux-x64 ./Peacock/node \
    && rm node.tar.gz
This bit unzips the Peacock.zip file we downloaded, deletes the .zip, removes the bundled version of Node.JS for Windows, and downloads the appropriate Linux version and un-tars it into the directory.
WORKDIR /PeacockThe WORKDIR command sets the current working directory, so all commands run relative to that location. In this case we’re just moving into the “/Peacock” directory we made when we unzipped the project.
RUN mkdir {userdata,contractSessions}Again using the run command, but this time to create a couple more directories we will later expose for volume mounting. The server uses these 2 directories for persistent user data.
COPY ["start_server.sh", "start_server.sh"]This command copies the startup script I made (which should be in the same directory as the Dockerfile on the host) into the current working directory of the image (/Peacock), which will allow us to call it to run the software.
RUN chmod a+x start_server.shThis run command marks the startup script as executable, so we can run it.
CMD ["./start_server.sh"]The CMD command sets the “starting point” of the container. This is the script/program that it will attempt to run when you start up a container of this image. In this case we’re setting the startup script we copied over. The script itself is very simple, and just calls the Peacock starting script in Node.JS running on port 80.
VOLUME /Peacock/userdata
VOLUME /Peacock/contractSessions
The VOLUME command specifies that a particular directory should be an externally mounted directory to the container from the host system. This allows you to keep persistent data. Any changes made to the files of a container are not maintained if the container is destroyed and a new one is created from the same image. By default, the VOLUME command will automatically make directories on the host when a container is spun up, but we can specific specific directories we want mounted too (bind mounting).
And that’s it for the Dockerfile! If you need a rundown of the other available commands, check out the Dockerfile Reference page.
Ok, now that we know how a Dockerfile works we need to run it! I’m jumping onto a terminal on my UNRAID server here, pathing to the script’s directory, and then running:
docker build -t gunslap/peacockserver:6.5.7 .This command says to build the Dockerfile in the current directory, and name it as “gunslap/peacockserver” with the version “6.5.7” tag. The name matches my Dockerhub account name and project name, which will allow me to upload it there later, and the tag is how we track different versions, or things like “latest” or “nightly”, etc. We can add additional tags to this version when it’s complete.
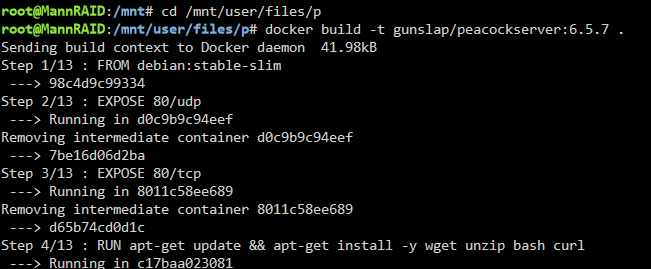
That will take a few minutes to run through all the commands and build the image. Once it’s complete you should see:
Successfully built <random characters>
Successfully tagged gunslap/peacockserver:6.5.7
in the terminal output. Then we can run:
docker tag gunslap/peacockserver:6.5.7 gunslap/peacockserver:latestThis command takes the image titled “gunslap/peacockserver” with the tag “6.5.7” (the one we just built) and adds the additional tag of “latest”. This way when we upload it to DockerHub it will replace the previous version tagged “latest” and anyone who asks for the “latest” version will now get this one.
Then we can run the following two commands:
docker push gunslap/peacockserver:latest
docker push gunslap/peacockserver:6.5.7
Which will push both of our tags “latest” and “6.5.7” to DockerHub. You should get a bunch of messages with the second one that each layer already exists, this is expected as these are the exact same image. We just want to make sure both tags are available for download from the hub, should someone want the specific version or just the latest.
This only works if you’re currently signed into DockerHub (or some other Docker repository) and are attempting to push to a repo that you have access to. If you’re not signed in you will have to use the docker login command first.
And that’s it! Now anyone using your image can query DockerHub / visit the website for the latest version.
You can still use the image you created even if you don’t upload it to DockerHub. Referencing the name + tag you set when you go to create a container will look locally first.
In my case I have an instance of the image pointed to Dockerhub, so I simply have to tell UNRAID to look for an update and apply it and I’m good to go. Thankfully Peacock is nice enough to output the current version to the terminal when it loads up, so I can peek there for an additional check that everything is updated and working correctly:

In the future I’d love to make it so the startup script itself checks for and downloads a new version of the application. I’ve seen other Docker images do this and it’s great. All you have to do is restart it and it will update itself.
@Jordy I didn't read all of this yet, but the start is confusing to me. You say in order to create a new docker image I need a base image? Isn't that a chicken and egg problem? Why do you need an image to create a new image? Or is that optional and depends on what you're trying to do? I'm guessing for most people you need a base image to bootstrap everything? You can't create a new image with just your Linux program? I've used docker for a little while now, but I don't know a lot of things.
Remote Reply
Original Comment URL
Your Profile
Why do I need to enter my profile?
This site is part of the ⁂ open social web, a network of interconnected social platforms (like Mastodon, Pixelfed, Friendica, and others). Unlike centralized social media, your account lives on a platform of your choice, and you can interact with people across different platforms.
By entering your profile, we can send you to your account where you can complete this action.
Sorry I was light on details on that part (and it is a tad confusing), but yes, you do require a base image to work off of. Docker virtualizes the whole operating system environment for the application, and you need a “base” image of an operating system to build off of essentially. Without the base image there’s nothing for your Docker image to run under. As you can see from my example there, the debian:stable-slim base image is so slim it doesn’t come with wget or curl, which are pretty standard Linux tools. This allows you to build out Docker images that contain the bare-minimum number of components to run your program.
It’s also possible to use any other Docker image as a base image and build from it. For instance you could build off a database image to run a program storing it’s data on that database.