If you’re like me and dove head-first into self hosting everything you could think of, there’s a good chance you ran into the same problem I did: How can I self-host an application to let me know if my self hosted applications go down??
There are some great self hosted monitoring apps (upTimeKuma), but if it’s on the server that goes down, well, it ain’t gonna do you much good. You could host it on a seperate server, or rent a tiny cloud instance for it, but the former isn’t going to help you if you’re house loses all power and the later costs money!
All I really need is a service to ping something that’s publicly exposed on my Home Server and let me know if it’s not up. Initially I found https://updown.io, which works great! They give you enough credits to last you 2 years if you set it to check every 15 minutes (which is plenty often enough for me). Well, now it’s been 2 years and I’m out of updown credits. The service isn’t very expensive, but again, I am CHEAP!
Then I came across https://www.uptimedoctor.com which lets you check 5 websites for free (up to every 5 minutes) and will send you an email if any of them are down. The email has some advertising for their services in it, but I’m more than willing to accept that trade-off for the price of free.
I set it up pointing to my public services page and boom! It’s good to go. Easy as that.
Uptimedoctor is perfect for my purposes, but I’m curious if anyone has another interesting solution to the self hosted monitoring problem?
I am a HUGE fan of the TimeSplitters video games. I absolutely adore them. For anyone not in the know, TimeSplitters is a series of wacky FPS games made by FreeRadicalDesign, a studio started by a bunch of the folks who used to work at RARE and worked on Goldeneye and Perfect Dark. TimeSplitters very much follows in the same vein as those previous games but with a wacky time and space hopping story that let them work in all sorts of weird characters and locations. These games really had it all: 2-player coop story, 4 player death matches with a bunch of weird modes, and single player arcade and challenge modes. I’ve probably put hundreds of hours into these games over the 20 odd years since they first released. I still go back and play the TS2 campaign again every couple of years. They are just that good! The closure of Free Radical in 2008 when they were trying to get TS4 off the ground (and had virtually completed Star Wars Battlefront III) is in my mind, one of the great injustices in gaming history.
Weirdly, there’s been a bunch of news on the TimeSplitters front in the last couple of months.
First up, some guy on Reddit bought a PS3 on eBay and realized it had a dev build of TimeSplitters 4 on it! He recorded a video of him playing it and even managed to dump it and release it online. It appears to be a single death match map of a gothic cathedral type setting. David Doak of FRD basically confirmed on Twitter that it was a demo to try and attract studio investment (which obviously didn’t work out). Still a cool little piece of gaming history.
Next up, Embracer Group had purchased what remained of FreeRadicalDesign in 2021 from CryTek (who scooped up their assets when they initially folded in 2008) and had restarted the studio and development on a new TimeSplitters! How Exciting! Welp… after the recent financial trouble Embracer has been in they went on a layoff spree and totally closed down FRD… AGAIN. Very disappointing and very sad for all of the developers working there who are now looking for work again.
One such developer was feeling a little fed up and leaked an internal preview video of the TimeSplitters game they were working on and… it basically looks like Fortnight? That’s kinda weird. Not exactly the type of game FRD was known for. According to Steve Ellis of FRD, this is actually an older build but since then they had pivoted in a very different direction. (That whole interview with Steve is worth a read).
And finally some mostly good news! TimeSplitters Rewind, the fan made mod project (that’s been in the works since the CryTek days), is getting close to completing TS1! What they’ve got so far looks great and I can’t wait to give it a go. Unfortunately, they are lacking in developers to get it across the finish line. Hopefully some people with the right skills will be able to lend a hand. It might be the only chance for new TimeSplitters content we ever get.
This blog runs on a WordPress Docker container, and WordPress has a handy little tool called “Site Health” that lets you know if you’ve configured anything wrong/sub-optimally. That’s great! However to my annoyance, it recommended that I enable caching… by installing one of a variety of 3rd party plug-ins. I’m not against caching, obviously that’s a great idea! What annoys me is that WordPress recommends everyone have caching enabled… but doesn’t offer it as a feature themselves! It’s so strange to tell me to go figure it out on my own. Thanks I guess?
I ended up installing W3 Total Cache as it looked like it doesn’t have too much extra crap, and wow, even just enabling some basic page caching dramatically speeds things up. I hear faster pages helps your Google search ranking too? I guess in the end I’m impressed, but still annoyed…
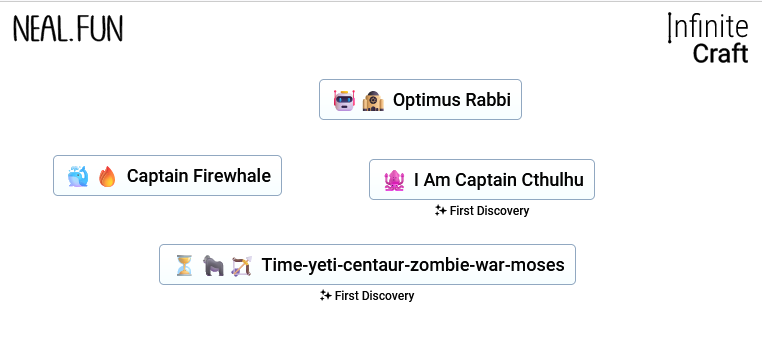
There’s this guy named Neal who makes the coolest little web games / interactive pages. (Seriously, everything on his site is so cool you should definitely check it out: https://neal.fun ).
His new “game” might be the weirdest, but also most addictive one yet. It’s called Infinite Craft, and starting with just “earth”, “wind”, “fire”, and “water” you drag and drop words on top of each other to craft new ones. That’s it. You just keep making new words and see what weird paths you can go down. If you happen to be the first person to discover a new word you get a little notification too. It’s so simple but really engrossing. I can’t stop trying to find new words! PLEASE SEND HELP.
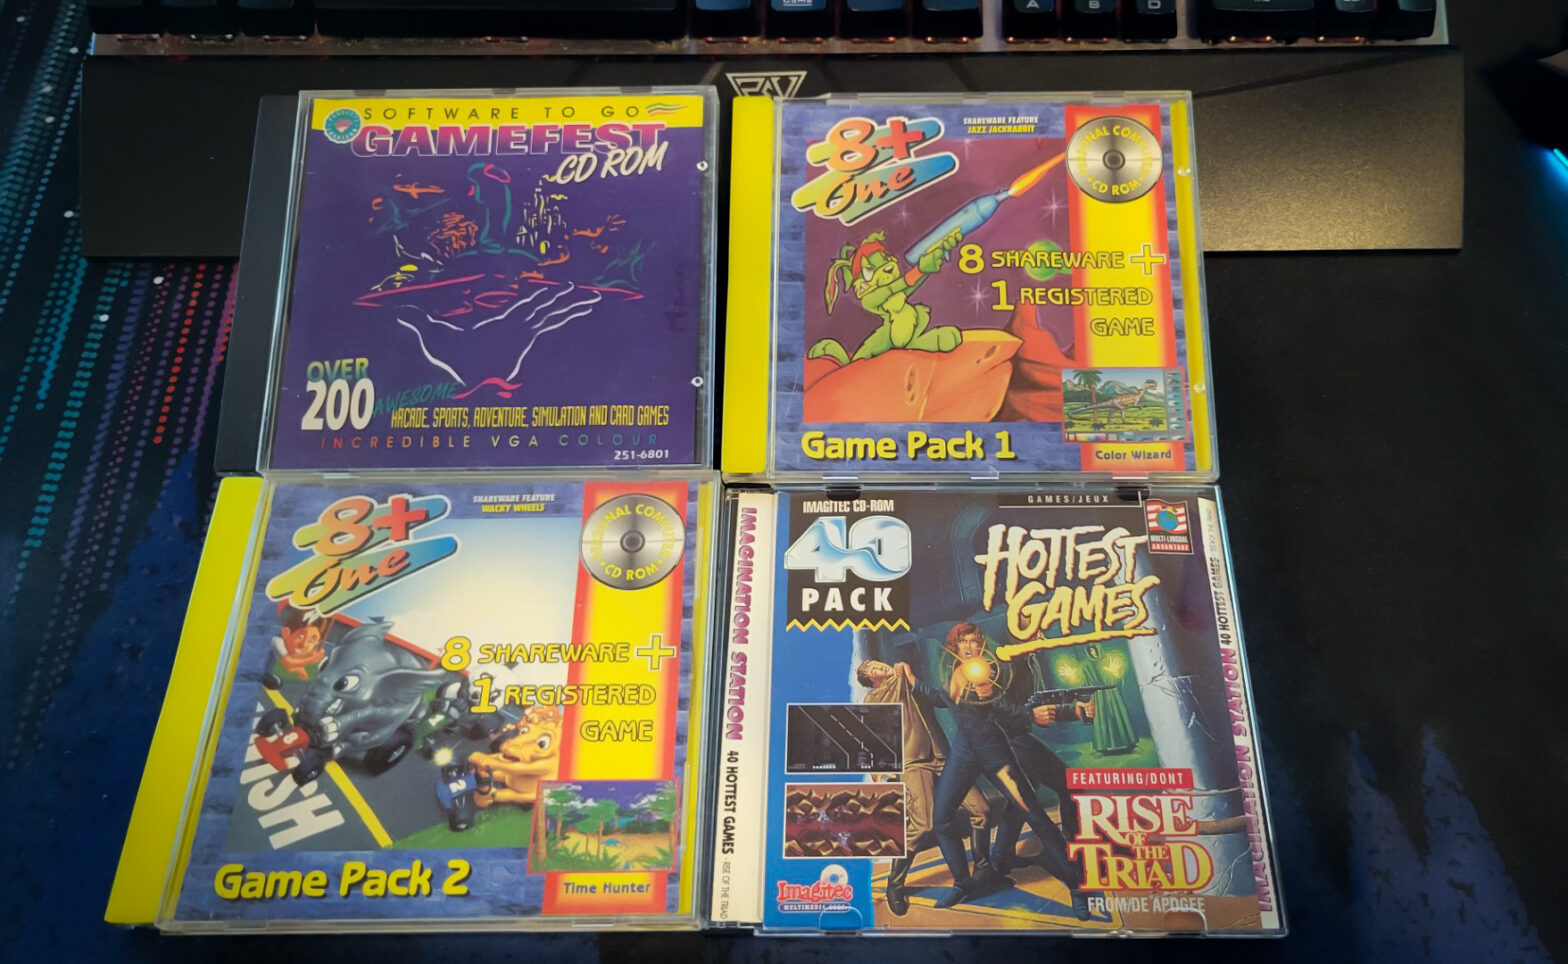
This is legitimately nuts! Someone made a collection of over 7000 full release DOS games you can download. It’s called eXoDOS. It comes with the DOS box emulator bundled, and a front end with box art and game descriptions and the whole 9 yards. Even a script to set it all up for you. Very slick!
When I was a kid we had an old Compaq Presario with Windows 3.1/DOS on it, and I played so many of those shareware DOS games. I never did buy a full game – I would just cycle through my different samples again and again and I was perfectly happy with that (sorry Apogee).
My only complaint here is that there’s too many games! I had to go hunt down my old shareware disks so I could find the handful I played as a kid and would love to see again. I have a lot of great memories with Commander Keen, Jazz Jackrabbit, The Hugo Trilogy, Duke Nukem 1+2, Rise of the Triad (with the coolest box art of ALL TIME), Monster Bash, Raptor, Pickle Wars, Wacky Wheels, and so many more I can’t remember the titles of.
Google recently announced that they’re discontinuing their web page caching service. Instead, they are directing folks to the Internet Archive’s Wayback Machine, which is a great project for sure, but it sucks to lose options. I know I’ve used both extensively. It’s handy when you need some information from a site that’s suddenly down, and I can’t count the number of times I’ve bookmarked a useful tutorial from a random blog that has gone completely missing the next time I try to access it.
But what if you could cache websites that are important to you… yourself?
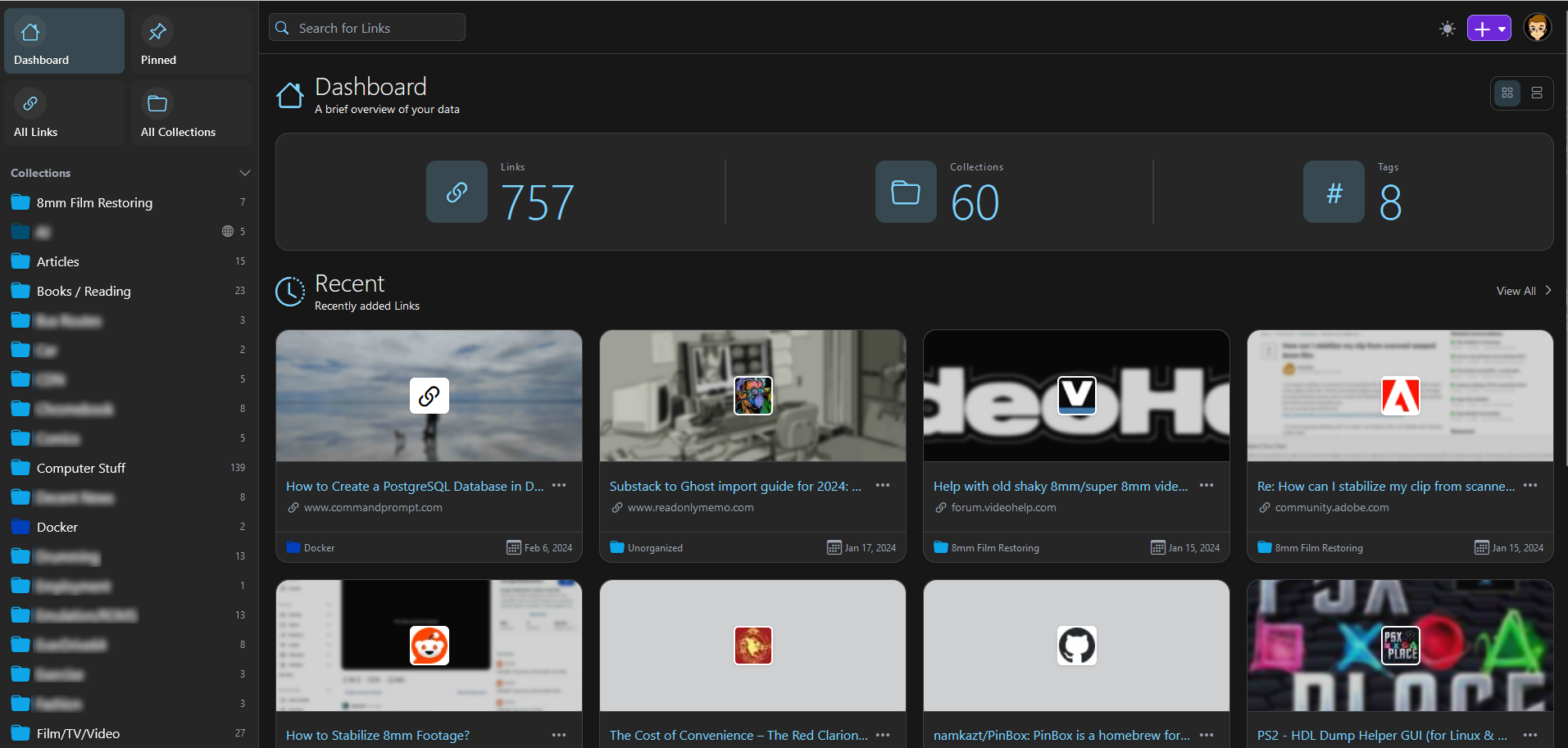
Linkwarden(if you somehow skipped the title of this post) is a self-hosted, web based bookmark manager that caches all the pages saved within it. It can be configured to save pages as a screenshot, PDF, and/or searchable text. Links can be arranged in collections and with multiple tags, making them very easy to search for.
I spun up an instance and imported all my browser bookmarks and man, it is SO much easier to find what links your looking for when they’re tagged and you can search the actual text content of the cached pages. I often find myself totally lost looking for exactly what I named some random tutorial I bookmarked 5 years ago in my browser (I refer back to a lot of tutorials, ok?). Interestingly, you can have multiple accounts on an instance and share collections between users to add to collaboratively. Not likely a feature I’ll use much, but could be handy for group research projects I guess?
It also has a plugin for most browsers allowing you to quickly add new links to it as you go. Super basic but it gets the job done. Honestly the only features I’d like to see added is the ability to search bookmarks from the browser plugin, and (this is very much wishful thinking) some way to add notes to the text cached pages. Sometimes I want add clarification to the tutorial steps! That’s perhaps a bit outside the scope of a tool like this, but I would love such a feature.
Wish list features aside this is a fantastic program and a great way to store web links in a way that actually makes them easy to find.
How I Cleaned Up My Bookmarks Before Importing Them Into Linkwarden
It turns out that my bookmarks were hella messy. Between moving back and forth between browsers multiple times and never ever cleaning them up before… it was bad. Thankfully I found a couple of handy Firefox extensions that made the cleanup much easier. I’m sure similar options exist for other browsers as well.
Duplicate Bookmark Finder – This extension lets you know if you have duplicate copies of the same bookmark and helps you to easily remove them. I had like 700 bookmarks and a couple hundred of them were duplicates… oops.
404 Bookmarks – This extension will ping all of your bookmarks and let you know which ones are already dead links. I had a lot of these as well. I ended up deleting a bunch that weren’t important to me anymore, and replacing the rest with a cached version from The Wayback Machine.
2024-03-08 Update: added Chiaki, how cool is that? 2024-10-10 Update: added XBPlay, like Chiaki but for Xbox!
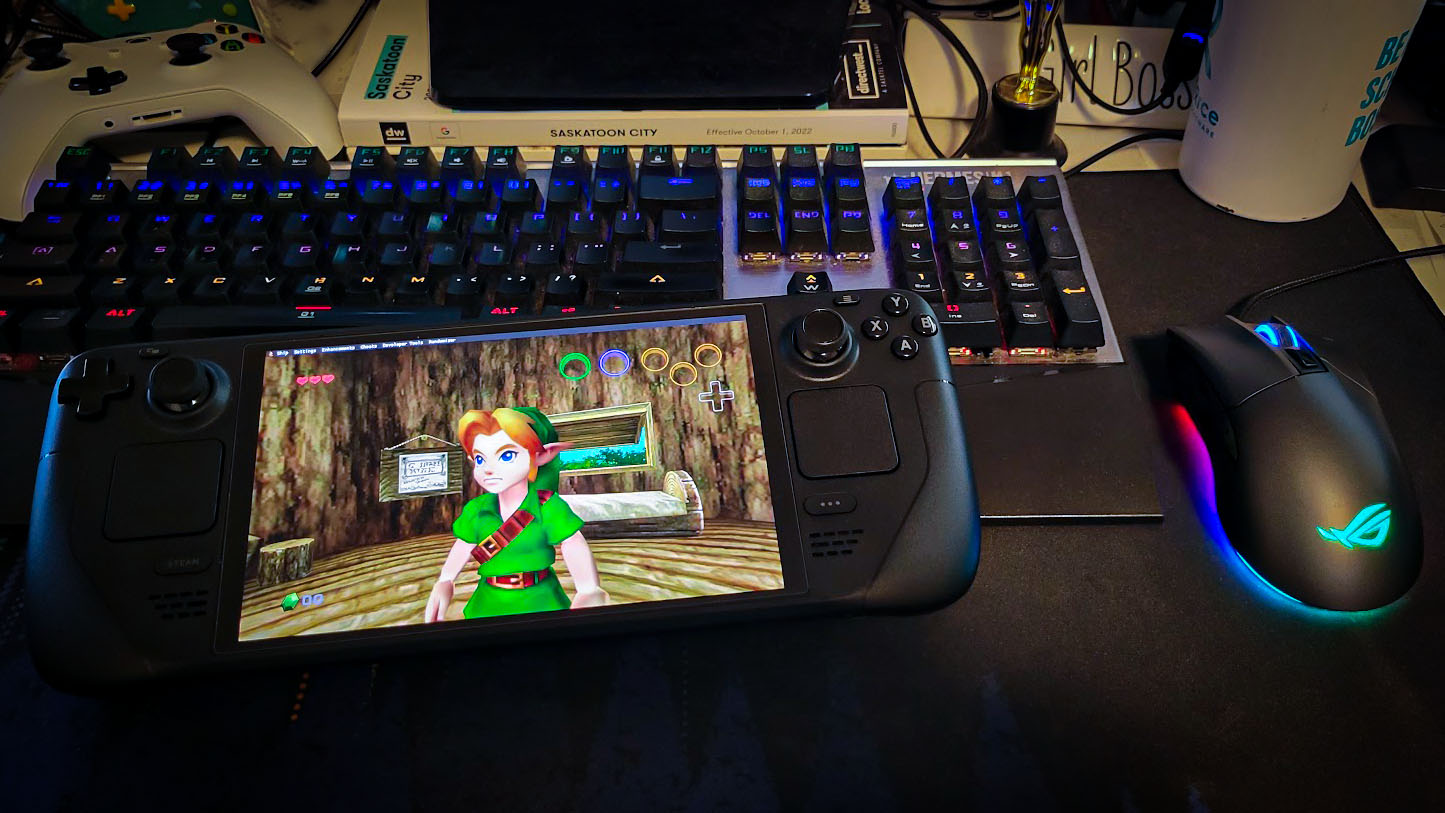
I finally caved and got myself a Steam Deck (one of the shiny new OLED ones even!) and being pathologically unable to just leave things as-is, it took about a day before I started to wonder what else you can do with one beyond just playing Steam games. Quite a bit actually!
Get a dock/USB-C hub and Use It As a Portable Desktop Computer
Obviously not the most convenient operation here, but Desktop mode works as advertised if that’s your jam.
It’s amazing how slick this script is. It will even add your ROMs to your steam library so you can search for and launch them just like any other game.
Too many plugins to list here, but I particularly like SteamGridDB which lets you update the images for your games – particularly useful to add images to non-steam games.
Install Other, Non-Steam Game Launchers & Games
The Non-SteamLaunchers-On-Steam-Deck script will take care of this for you automatically. It can even make shortcuts to popular streaming sites too.
Alternatively, you can install the Heroic Launcher for Epic/GOG/Amazon titles.
Proton-GE is a community developed fork that contains extra fixes that may make some games run better. You can get it from the Non-SteamLaunchers script as well.
Even Install Freaking Android Apps On It?!? Yeah sure, why not, go crazy!
Install Minecraft Java Edition with Steam Deck Controller Support
There’s a lovely Linux Minecraft launcher called Prism which contains a mod pack aptly titled “Fabulously Optimized mod pack” with great Steam Deck controller support.
Install Linux Native Fan Ports of Classic Games
I am constantly amazed by all of the reverse-engineered (or reconstructed from scratch!) fan ports of games. If they have a Linux version then there’s a good chance they should work on your steam deck. Install them in desktop mode, and right click on the executable and select “Add to Steam” and you should be good to go!
Obviously the steps to do so will vary per game, but here’s some instructions for Stardew Valley.
Install Chiaki4Deck and Stream your PS4/PS5 to Your Deck
Chiaki is an open source re-implementation of Sony’s remote play software that works on Linux. Someone made a special version just for the Steam Deck and it works great!
Install XBPlay and Stream your Series X/S to Your Deck
No need to feel left out if you own an Xbox! I’ve just learned that a similar tool exists for team green. Unfortunately this one costs $7 USD and I haven’t tried it myself, but the reviews on Stema are good!
That’s everything I’ve found. Is there anything cool I’ve missed? Let me know!
I’ve got an old fat model PS2 sitting in a box that couldn’t read disks for some reason. I figured it might be fun to try and fix that up. After doing some reading online it turns out there’s a bunch of issues that could cause your PS2 to not read disks, but most people suggest the laser is the likely culprit and will need to be replaced. You can get a new laser shipped from Ali Express for about $20, so why not? I ordered one and gave it a go when it arrived.
I found a very nice tutorial on YouTube showing you how to swap the laser. I had to get a buddy to remove the little solder blob for me since I don’t own a soldering iron, but the rest was easy: Pop it open, open the drive, take the laser off the rail, disconnect the ribbon cable, and then reverse it with the new laser.
Well I put it all back together and… it didn’t work. Crap.
So after some research… Other Possible Issues Preventing a PS2 From Reading Disks:
The laser skew needs to be adjusted
The laser is dirty
The motor rail is bent / worn down
The worm gear / rails need to be re-greased
The magnet can’t get a good hold of the disk and so it can’t spin up to full speed
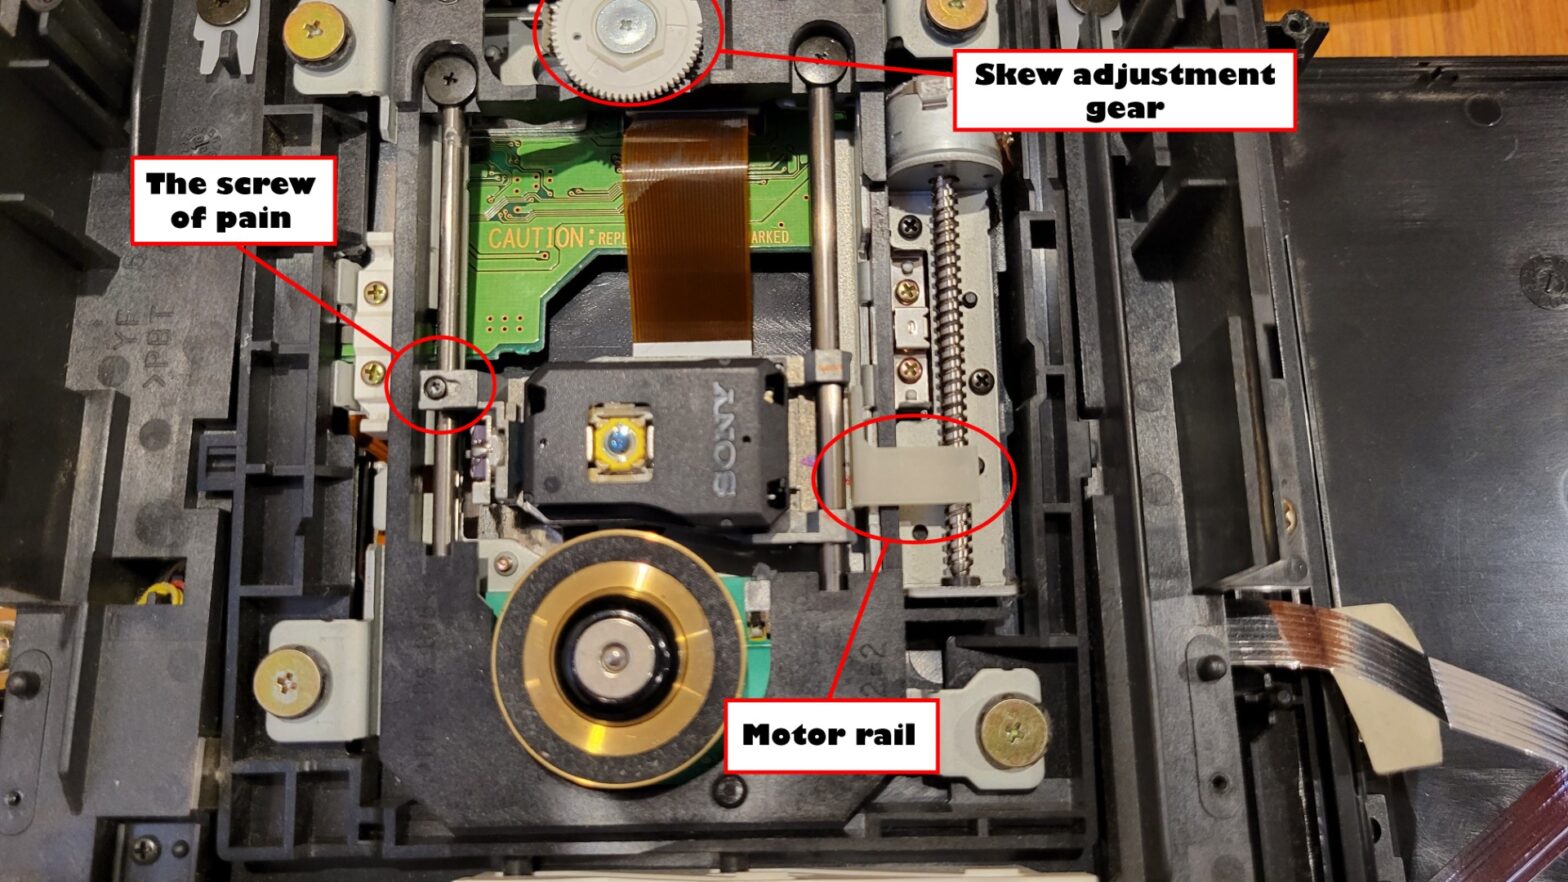
I started with the skew adjustment. As you can see from my header image, there’s a large white gear just above the laser. Turning this gear adjusts the skew of the laser. You’ll notice as you turn it clockwise the laser housing raises slightly, and if you keep going it will eventually fall down to the starting position and then starting moving up again.
Most people recommend you use a marker to put a little mark on the gear’s initial position, and then drop it down to the starting position and work your way up slowly to see what position works best. You’re going to want to turn the gear a couple of notches, and then try to load a disk. If it doesn’t work, turn it a couple more. It’s a pretty slow process, so to speed it up make sure you’ve disassembled your disk drive housing and popped out the magnet from the top of the drive (it looks like it’s stuck in there good, but it is flexible enough to pop out). This way you can just set the magnet on top of the disk and pop the tray in and out to make quick adjustments.
In my case, I eventually found a sweet spot where the PS2 would try to load the disk, but couldn’t quite make it. I’d get the white on black “PlayStation 2” loading screen… and nothing for a bit, and then it would give up and toss me back at the main menu.
Unfortunately, none of the other possible issues seemed to be effecting me either. The laser was brand new, the rails and worm gear were well greased, the motor rail seemed to be connecting well, and I’d popped the magnet right out of drive housing so it was sitting directly on the disk. However I did notice two other strange things: After adjusting the skew of the laser the PS2 could successfully load PS1 disks(but not any type of PS2 disk), and it make a strange clicking sound when it tried to load PS2 disks and failed. The fact it could read PS1 disks told me the laser wasn’t a dud and was connected correctly at least.
I took it apart again and was manually moving the laser assembly up and down the worm gear when I noticed something odd… the left side of the laser was clipping on the edge of a PCB board directly underneath it! Well that would explain the weird clicking! But why was this happening? From what I could tell it was just barely clipping the board, and if the laser was raised ever so slightly higher it would easily clear the board. I took a look at the old laser and noticed something different: The old laser had a little screw that went through it and pushed against the left rail, raising it ever so slightly, and my new laser was missing this screw! I moved the screw over and viola! the new laser could clear the board and move freely and read the disk now!
And look at that, it successfully read Virtual Fighter Evolution, the least scratched disk I own!
Now my best guess as to why it would successfully load PS1 disks when the laser module couldn’t move past the half way point is that maybe everything it needs to successfully boot a PS1 disk (or at least the ones I tried) exist right near the center of the disk. I’m sure if I kept playing those games I’d eventually hit a point where the laser hit the PCB and was unable to read further. Still, very odd.
I also double checked that YouTube laser swap tutorial, and he doesn’t mention anything about having to move that weird little screw over, but I do see the screw on his new laser. I suspect most new lasers must come with this screw attached and mine was just missing it for some reason.
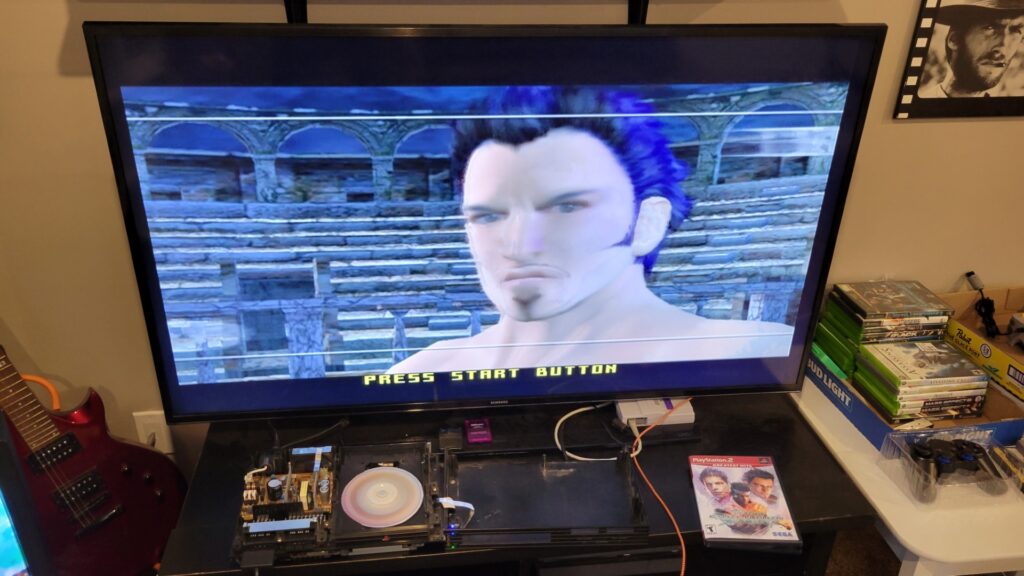
Either way, I’ve now got a PS2 that can successfully read disks and load up games! MISSION ACCOMPLISHED.
A couple of years ago I had to learn how to make ODATA API’s to allow access to some of our applications at work. I was amazed at how easy Microsoft makes this process for you in Visual Studio, there’s so much scaffolding that doesn’t really change between projects and they just… do it all for you automatically? How nice!
If you’ve read my past few blog entries you’ll know I’m a big fan of self-hosting and Docker containers, and now that Microsoft’s newest versions of DotNet can run on Linux this got me thinking… how hard would it be to make an ODATA API project into a Docker container? As it turns out, very easy!
I took an old joke script I’d made and turned it into an ODATA Web API to help me learn the ropes. It’s basically a mad-lib generator that spits out random bits of text you can configure. Very dumb, but a perfect candidate to test containerizing.
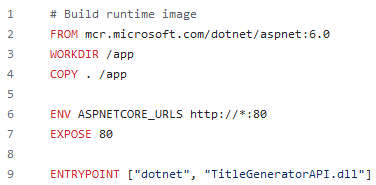
Let’s take a look at the Dockerfile I made for containerizing that project:
Really? That’s It???
As you can see there’s almost nothing to it. It’s way less complicated than my last Dockerfile example. Let’s go over each part:
FROM mcr.microsoft.com/dotnet/aspnet:6.0
Microsoft provides their own base images that have the ASP.Net for Linux runtime installed and ready to go, so we just have to specify one of those images to build off of (when I made this, asp.net 6.0 was the latest version available, just make sure you match the version your project is using)
WORKDIR /app
COPY . /app
First you have to compile the application in Visual Studio, but assuming you’ve got it in the same directory as this Dockerfile, you simply need to run this copy all command to pull the whole project into the image.
ENV ASPNETCORE_URLS http://*:80
The ENV command lets you set environment variables and we’re setting the ASPNETCORE_URLS to “http//:*:80”, which tells the DotNet runtime to listen on port 80 for any IP address it has
EXPOSE 80
This exposes port 80 externally so the container can use that port.
ENTRYPOINT ["dotnet", "TitleGeneratorAPI.dll"]
This line says when the container runs to call the compiled program (TitleGeneratorAPI.dll) in DotNet.
The ENTRYPOINT command is similar to CMD which we used last time, but allows you to pass in additional arguments (which we aren’t doing here, but you know, let’s mix it up a little).
And that’s really it. Build the image, spin up a container, and you’re good to go!
if you really want to, you can grab the compiled container for this example project from it’s DockerHub repo and see it in action.
Docker containers are amazing AND they’re surprisingly simple to make! As long as you know the basics of Linux you have what it takes!
All you need is:
A program that runs in Linux to containerize
A base image
A startup script to launch the program (you could call it directly, but this gives us some flexibility)
a dockerfile to put it together
I’m a big fan of the new HITMAN video games, but annoyingly you need to always be online to use most of the features. Thankfully some really smart folks made a little Node.JS HITMAN server replacement you can point your game at instead if you’d rather play locally called “The Peacock Project“. This program is great, and I noticed no one else had made a containerized version yet so I went ahead and did that myself!
Come along with me as I update it to the latest version and you can see how simple the process is.
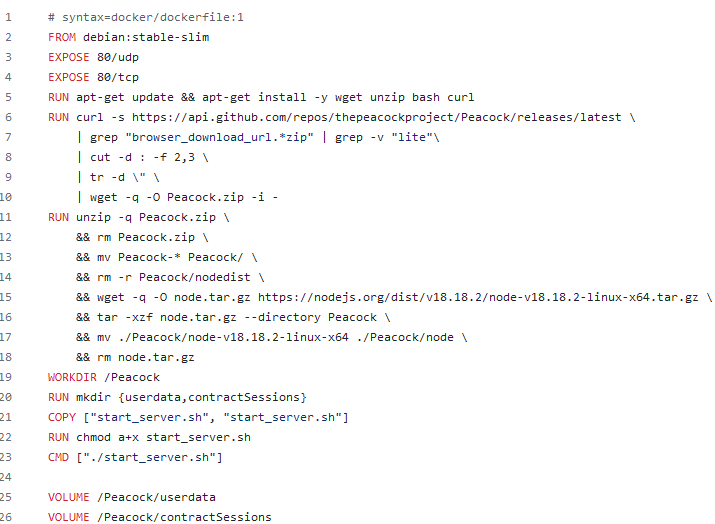
First, let’s take a look at the Dockerfile on my github page:
Some of this is a bit convoluted, but I’ll break it down (I promise it’s not that bad!) Running this file “compiles” your docker image so the file needs to include information on all the steps it takes to put your container together.
# syntax=docker/dockerfile:1
The first line simply indicated that this is a dockerfile
FROM debian:stable-slim
This line indicates what base image to use. Debian slim is just what it sounds like: a version of Debian that doesn’t have much bundled in with it, this will help keep our image super small.
EXPOSE 80/udp
EXPOSE 80/tcp
These two lines indicate which ports internal to the container should be exposed externally. These will be whatever ports your application itself uses (assuming it needs to talk over the network). In this case, Peacock uses port 80, the standard unencrypted web traffic port. When you go to setup an instance of the image you can map these to different external ports on your host.
The “RUN” command specifies that you want to run some shell commands internally to the image. In this case, make sure that our package lists are up to date and install the wget, unzip, bash, & curl tools, as we’ll need those later (yes, this base image is THAT slim!)
This is the most complicated bit, but essentially I’m telling it to go to the releases page of the peacock github repo and download the .zip file for the release tagged “latest” and renames it to “Peacock.zip” to keep things simple.
This is pretty cool and makes updating my docker image semi automatic – when there is a new version I just have to compile the dockerfile again and it will automatically grab the newest version for me. A lazier version of this could have a hardcoded download link and would need to be updated between versions.
This bit unzips the Peacock.zip file we downloaded, deletes the .zip, removes the bundled version of Node.JS for Windows, and downloads the appropriate Linux version and un-tars it into the directory.
WORKDIR /Peacock
The WORKDIR command sets the current working directory, so all commands run relative to that location. In this case we’re just moving into the “/Peacock” directory we made when we unzipped the project.
RUN mkdir {userdata,contractSessions}
Again using the run command, but this time to create a couple more directories we will later expose for volume mounting. The server uses these 2 directories for persistent user data.
COPY ["start_server.sh", "start_server.sh"]
This command copies the startup script I made (which should be in the same directory as the Dockerfile on the host) into the current working directory of the image (/Peacock), which will allow us to call it to run the software.
RUN chmod a+x start_server.sh
This run command marks the startup script as executable, so we can run it.
CMD ["./start_server.sh"]
The CMD command sets the “starting point” of the container. This is the script/program that it will attempt to run when you start up a container of this image. In this case we’re setting the startup script we copied over. The script itself is very simple, and just calls the Peacock starting script in Node.JS running on port 80.
The VOLUME command specifies that a particular directory should be an externally mounted directory to the container from the host system. This allows you to keep persistent data. Any changes made to the files of a container are not maintained if the container is destroyed and a new one is created from the same image. By default, the VOLUME command will automatically make directories on the host when a container is spun up, but we can specific specific directories we want mounted too (bind mounting).
And that’s it for the Dockerfile! If you need a rundown of the other available commands, check out the Dockerfile Reference page.
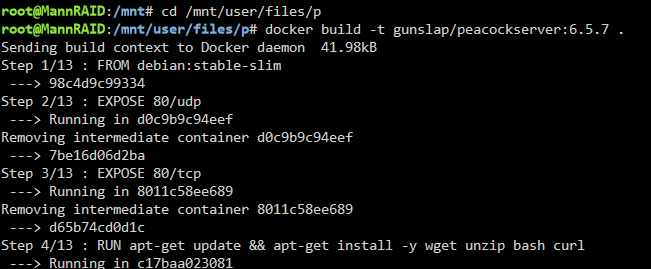
Ok, now that we know how a Dockerfile works we need to run it! I’m jumping onto a terminal on my UNRAID server here, pathing to the script’s directory, and then running:
docker build -t gunslap/peacockserver:6.5.7 .
This command says to build the Dockerfile in the current directory, and name it as “gunslap/peacockserver” with the version “6.5.7” tag. The name matches my Dockerhub account name and project name, which will allow me to upload it there later, and the tag is how we track different versions, or things like “latest” or “nightly”, etc. We can add additional tags to this version when it’s complete.
That will take a few minutes to run through all the commands and build the image. Once it’s complete you should see:
Successfully built <random characters> Successfully tagged gunslap/peacockserver:6.5.7
in the terminal output. Then we can run:
docker tag gunslap/peacockserver:6.5.7 gunslap/peacockserver:latest
This command takes the image titled “gunslap/peacockserver” with the tag “6.5.7” (the one we just built) and adds the additional tag of “latest”. This way when we upload it to DockerHub it will replace the previous version tagged “latest” and anyone who asks for the “latest” version will now get this one.
Which will push both of our tags “latest” and “6.5.7” to DockerHub. You should get a bunch of messages with the second one that each layer already exists, this is expected as these are the exact same image. We just want to make sure both tags are available for download from the hub, should someone want the specific version or just the latest.
This only works if you’re currently signed into DockerHub (or some other Docker repository) and are attempting to push to a repo that you have access to. If you’re not signed in you will have to use the docker login command first.
And that’s it! Now anyone using your image can query DockerHub / visit the website for the latest version.
You can still use the image you created even if you don’t upload it to DockerHub. Referencing the name + tag you set when you go to create a container will look locally first.
In my case I have an instance of the image pointed to Dockerhub, so I simply have to tell UNRAID to look for an update and apply it and I’m good to go. Thankfully Peacock is nice enough to output the current version to the terminal when it loads up, so I can peek there for an additional check that everything is updated and working correctly:
In the future I’d love to make it so the startup script itself checks for and downloads a new version of the application. I’ve seen other Docker images do this and it’s great. All you have to do is restart it and it will update itself.

